The Squid Game Soldier Amigurumi Pattern in English


squid game amigurumi

⚠️⚠️⚠️PLEASE DO NOT SHARE MY PATTERN TO GET FOLLOWERS OR IF YOU SHARE
MULTIPLE PATTERNS A DAY. Remember NOT TO TRANSLATE MY PATTERN. If you do so, you’ll be reported for copyright.

Some days ago, Netflix released  a korean series called The Squid Game and my boyfriend and I decided to watch it. Of course, we saw it in just a couple of days because it´s great! It hooks you and each time yo want more and more, so I absolutely recommend it.

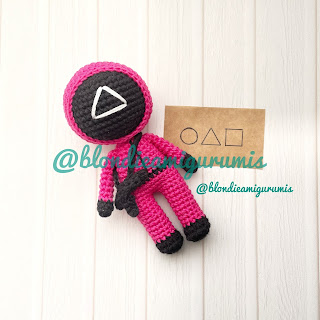
That's why this time I want to share with you this pattern for a soldier from this show. He has a triangle in his mask, but you can also make him with a circle or a square if you wish.

The doll's final size is 14 cms (approx 6 inches) if you use a similar material.


THIS IS A FREE PATTERN.  Crochet design by María Paz Jélvez Herrera (Blondieamigurumis)
If you want to share this pattern please do it directly sharing the link of this entry. Taking screenshots, translating this pattern, making challenges or CALs or online videos without my permission is absolutely prohibited.

You might sell finished dolls made with this pattern. If you share your work on social media, please tag me as the pattern designer using @blondieamigurumis.


Materials:
  • Black and dark fuchsia cotton yarn
  • White emboridery floss
  • 2.5 crochet hook
  • Yarn needle
  • Fiberfill
  • Stitch marker
  • Scissors


Abbreviations:

MR: magic ring

Sc: single crochet

Incincrease

Decdecrease

Chch

Sl st: slip Stitch

(  )x number: repeat x times

(number): number of stitches at the end of the round


Work in spiral, unless told otherwise.

Head:

Use black:
1: 6sc in MR (6)
2: 6inc (12)
3: (sc, inc)x6 (18)
4: (2sc, inc)x6 (24)
5: (3sc, inc)x6 (30)
6: (4sc, inc)x6 (36)
7: (5sc, inc)x6 (42)
8 - 14: (7 rounds) 42sc (42)
15: (5sc, dec)x6 (36)
16: (4sc, dec)x6 (30)
17: (3sc, dec)x6 (24)
Stuff firmly
18: (2sc, dec)x6 (18)
19: (sc, dec)x6 (12)
20: 6dec(6)
Finish off.

⚠️PLEASE DO NOT USE MY PHOTOS  TO PROMOTE YOUR WORK. Of course you can sell dolls made with this pattern, but USE YOUR OWN PHOTOS. Using mine is tricking your clients. ⚠️

Hood:

Use dark fuchsia:
1: 6sc in MR (6)
2: 6inc (12)
3: (sc, inc)x6 (18)
4: (2sc, inc)x6 (24)
5: (3sc, inc)x6 (30)
6: (4sc, inc)x6 (36)
7: (5sc, inc)x6 (42)
8 - 15: (8 rounds) 42sc (42)
Insert the head inside the hood. 
16: (5sc, dec)x6 (36)
Work a sl st on the last stitch.
Finish off.

Arms:

Make 2
Use black:
1: 6sc in MR (6)
2: (inc, 2sc)x2 (8)
3: (1 round) 8sc (8)
Change to fuchsia
4 - 11: (8 rounds)  8sc (8)
Flatten the arm and work on both sides together (4sc)
Fasten off leaving a long tail.


Legs:

Make 2
DO NOT cut the thread in the second leg, for we will continue working with it.
Use black:
1: 6sc in MR (6)
2: 6inc (12)
3: (sc, inc)x6 (18)
4: 3sc, 6dec, 3sc (12)
Change to fuchsia
5 - 13: (9 rounds) 12sc (12)
Stuff firmly
Continue in body


Body:

Stuff as you go
Join legs:
Starting in the second leg you made (remember not to cut the thread)
14: 5sc, 2ch, attach yarn to the third to last stitch of the other leg, 12sc, 2sc on ch, 12sc on the other leg, 2sc on ch (28)
15 - 17: (3 rounds) 28sc (28)
Change to black
18: 5ac, dec, 12sc, dec, 7sc (26)
Change to fuchsia
19: (1 round) 26sc (26)
20: 5sc, dec, 11sc, dec, 6pb (24)
21 - 22: (2 rounds) 24sc (24)
23: (2sc, dec)x6 (18)
24: (1 round) 18sc (18)
Join arms: (leave the arm threads so you can secure the arms later)
25: 2sc, join arm working 4sc on both the arm and the body, 6sc, join arm working 4sc on both the arm and the body, 2sc (18)
26: (sc, dec)x6 (12)
Cut a long thread and sew the body to the head.
Use the arm threads and make some stitches on them so you can secure them.
Using black, emborider a line in the front part of the body, from the belt to the neck.


Machine gun:

Use black:
1: 5Sc in MR (5)
2 -8: (7 rounds) 5sc (5)
Cut the thread and finish off
Handle:
Use black:
5ch, 4sc.
Sew it to the lower part of the machine gun.

Machine gun strap:

Attach the yarn to the 3rd round of the machine gun, work 28 chains, and attach it again to the 5th round of it. Put it to the doll (see photos)

Triangle:

Using white floss, embroider the triangle (or if you want the circle or square) to the upper half of the mask. I made it with 6stitches of width.

And you're ready! Your Squid GAme soldier is ready!!!!!

If you crochet him, don't forget to tag me on your social media! Oinstagram use @blondieamigurumis and on facebook, @Blondieamigurumis Chile. You can also use the hashtag #blondieamigurumis


If you want to share this pattern please do it directly sharing the link of this entry, unless you have a site or account that shares multiple patterns and is only used to do that. Taking screenshots, translating this pattern, making challenges or CALs, YouTube or online videos without my permission is absolutely prohibited.

If you share on Facebook: I prefer you share my own post I made on my Facebook page. Please do not download my photo and then upload it. Thank you.



Soldado de El Juego del Calamar, Patrón en Español


el juego del calamar amigurumi
 ⚠️⚠️⚠️NO COMPARTIR MI PATRÓN en caso que tengas una cuenta/página que comparte patrones masivamente. No ganes seguidores con mi trabajo. Si lo haces, recibirás una denuncia por derechos de autor.

Hace algunos días, Netlfix estrenó una serie coreana llamada El Juego del Calamar y decidimos verla con mi novio. Obviamente la vimos en un par de días. La serie te engancha inmediatamente y cada vez quedas con ganas de más, así que la recomiendo totalmente.

Por eso es que en esta oportunidad les traigo un patrón para hacer al clásico soldado de los que salen en la serie. En esta oportunidad es uno de los que tiene un triángulo en su máscara, pero también puedes hacerle un círculo o un cuadrado si deseas.

Su tamaño final es de 14 cms si utilizas material similar al mío.

ESTE ES UN PATRÓN GRATUITO.  Diseño de Crochet de María Paz Jélvez Herrera (Blondieamigurumis)
Si quieres compartir este patrón, por favor hazlo directamente copiando el link de esta entrada. El sacar screenshots, traducir este patrón, hacer desafíos o CALs o videos online Ian mi permiso está absolutamente prohibido.
Puedes vender los muñecos terminados con este patrón. Si compartes tu trabajo en RRSS, por favor etiquétame como diseñadora del patrón. 


Materiales:

  • Hilo de algodón negro y fucsia oscuro.
  • Hilo de bordar blanco
  • Crochet/ganchillo de 2,5mm
  • Aguja de lana
  • Algodón sintético para rellenar
  • Marcador de puntos
  • Tijera


Abreviaciones:

AM: anillo mágico

Pb: punto bajo

Aumaumento

Dismdisminución

Cadcadeneta (cadena)

Pe: punto enano o deslizado

(  )x número: repetir x veces

(número): cantidad de puntos al final de la vuelta


Tejer en espìral, a menos que se indique lo contrario.

Cabeza:

Con negro:
1: 6pb en Am (6)
2: 6aum (12)
3: (pb, aum)x6 (18)
4: (2pb, aum)x6 (24)
5: (3pb, aum)x6 (30)
6: (4pb, aum)x6 (36)
7: (5pb, aum)x6 (42)
8 - 14: (7 vueltas) 42pb (42)
15: (5pb, dism)x6 (36)
16: (4pb, dism)x6 (30)
17: (3pb, dism)x6 (24)
Rellenar firmemente
18: (2pb, dism)x6 (18)
19: (pb, dism)x6 (12)
20: 6dism (6)
Rematar y cerrar.

⚠️POR FAVOR NO USES MIS FOTOS PARA PROMOCIONAR TU TRABAJO. Puedes vender cuantos muñecos quieras hechos con este patrón, pero con FOTOS PROPIAS. Usar fotos ajenas es engañar a tus clientes⚠️

Gorro:

Con fucsia oscuro:
1: 6pb en Am (6)
2: 6aum (12)
3: (pb, aum)x6 (18)
4: (2pb, aum)x6 (24)
5: (3pb, aum)x6 (30)
6: (4pb, aum)x6 (36)
7: (5pb, aum)x6 (42)
8 - 15: (8 vueltas) 42pb (42)
Poner el gorro en la cabeza, la cara debe quedar descubierta.
16: (5pb, dism)x6 (36)
Hacer un pe en el último punto y rematar.


Brazos:

Haz dos
Con negro:
1: 6pb en Am (6)
2: (aum, 2pb)x2 (8)
3: (1 vuelta) 8pb (8)
Cambiar a fucsia
4 - 11: (8 vueltas)  8pb (8)
Aplastar el brazo y tejer juntos ambos lados (4pb).
Cortar hebra larga.


Piernas:

Hacer 2
NO cortar la hebra en la segunda pierna pues continuaremos tejiendo con ella.
Con negro:
1: 6pb en Am (6)
2: 6aum (12)
3: (pb, aum)x6 (18)
4: 3pb, 6dism, 3pb (12)
Cambiar color a fucsia oscuro.
5 - 13: (9 vueltas) 12pb (12)
Rellena firmemente
Continuar en cuerpo


Cuerpo:

Rellena a medida que avanzas
Unir piernas:
Comenzando en la segunda pierna que hiciste (a la que no le cortaste la hebra)
14: 5pb, 2cad, sigue tejiendo en el ante penúltimo punto de la otra pierna 12pb, 2pb en cad, 12pb en la otra pierna, 2pb en cad (28)
15 - 17: (3 vueltas) 28pb (28)
Cambiar a negro
18: 5pb, dism, 12pb, dism, 7pb (26)
Cambiar a fucsia
19: (1 vuelta) 26pb (26)
20: 5pb, dism, 11pb, dism,. 6pb (24)
21 - 22: (2 vueltas) 24pb (24)
23: (2pb, dism)x6 (18)
24: (1 vuelta) 18pb (18)
Unir brazos: (deja las hebras por fuera pues servirán para reforzar los brazos)
25: 2pb, unir brazo tejiendo 4pb tanto en el brazo como en el cuerpo, 6pb, unir brazo con 4pb tanto en el brazo como en el cuerpo, 2pb (18)
26: (pb, dism)x6 (12)
Cortar hebra larga y cose el cuerpo a la cabeza
Usando las hebras que sobraron de los brazos, refuerza los lados de este haciendo algunas puntadas.
Con negro, borda una línea en la parte delantera del muñeco que vaya desde el cinturón hasta su cuello.

Metralleta:

Con negro:
1: 5pb en Am (5)
2 -8: (7 vueltas) 5pb (5)
Cortar hebra y rematar
Mango:
Con negro:
5cad, 4pb.
Coser a la metralleta en la parte de abajo.

Tira de la metralleta:

Engancha el crochet en la vuelta 3 de la cadeneta, teje 28 cad y engánchalo entre las vueltas 5 y 6 de la metralleta, Pónsela al muñeco (guíate por la foto).

Triángulo:

Con  hilo de bordar blanco, borda el triángulo (o si prefieres el círculo o cuadrado) en la mitad superior de la máscara de nuestro personaje. Yo lo hice de 6 puntos de ancho.


Y listo!!!! Está listo tu soldado de El Juego del Calamar!!!

Si lo tejes, no olvides etiquetarme en tus RRSS! Usa el hashtag #blondieamigurumis; en instagram usa @blondieamigurumis y en facebook @Blondieamigurumis Chile.


Si quieres compartir este patrón hazlo directamente compartiendo el link de esta entrada. Está prohibido sacar screenshots, traducir, hacer retos, videos de YouTube, videos en vivo, TRADUCIR el patrón o hacer talleres sin mi autorización utilizando este patrón.

Si me compartes en Facebook, por favor hazlo directamente de la publicación que tengo en mi página. Por favor no guardes la foto y de ahí la subas tú.


juego del calamar amigurumi


Mini Harry Potter - Patrón en Español


Gracias a estas instrucciones puedes tejer tu propio mini Harry Potter. Su tamaño final es de 10 cms si usas materiales similares a los míos.

ESTE ES UN PATRÓN GRATUITO.  Diseño de Crochet de María Paz Jélvez Herrera (Blondieamigurumis)
Si quieres compartir este patrón, por favor hazlo directamente copiando el link de esta entrada. El sacar screenshots, traducir este patrón, hacer desafíos o CALs o videos online Ian mi permiso está absolutamente prohibido.
Puedes vender los muñecos terminados con este patrón. Si compartes tu trabajo en RRSS, por favor etiquétame como diseñadora del patrón. 


Este patrón se trabaja en espiral, a menos que se indique lo contrario.

Materiales

  • Hilo de algodón en los siguientes colores: piel claro, gris claro, gris oscuro (marengo) y negro.
  • Crochet (ganchillo) de 2mm
  • Crochet (ganchillo) de 2,5 o 3mm
  • Ojos de seguridad de 8mm
  • Hilo de bordar amarillo, rojo, blanco y negro.
  • Pequeños lentes de metal. Si no tienes puedes hacer unos.
  • Aguja lanera
  • Paño lenci (fieltro) blanco.
  • Pegamento

Abreviaciones


AM: anillo mágico

Pb: punto bajo

Aumaumento

Dismdisminución

Mpa: medio punto alto

Cadcadeneta (cadena)

Pe: punto enano o deslizado

(  )x número: repetir x veces

(número): cantidad de puntos al final de la vuelta


Brazos:

Con color piel claro, no rellenar.

V1: 5pb en Am (5)

V2: (1 vuelta)5pb (5) cambiar a gris

V3  (6 vueltas) 5pb (5)

Aplastar el brazo y teje en dos capas 2pb

Cortar y rematar.


Piernas:

Con negro, rellenar a medida que avanzas, no cortar la hebra en la segunda pierna

V1: 6pb en Am (6)

V2: 6aum (12)

V3: 3pb, 3dism, 3pb (9) cambiar a gris oscuro

V4: 3pb, dism, 4pb (8)

V5 -9: (5vueltas) 8pb (8) 

Cortar la hebra sólo en la primera pierna, pues continuaremos en el cuerpo. 


Cuerpo

V10, unir piernas: 3pb, 2cad, 8pb en la primera pierna, 2pb en cad, 8pb en la segunda pierna, 2pb en cad (20)

V11 – 12: (2vueltas) 20pb (20) cambiar a gris

V13-14: (2 vueltas) 20pb (20)

V15: 4pb, dism6pb, dism6pb (18)

V16: (1 vuelta) 18pb (18)

V173pb, dism, 6pb, dism,5pb (16)

V18: 3pb, dism, 4pb, dism5pb(14) cambiar a piel claro

V19Unir brazos: 2pb, unir primer brazo tejiendo tanto en el brazo como en cuerpo 2pb, 1pb, dism, 1pb, unir segundo brazo tejiendo tanto en el brazo como en el cuerpo 2pb2pb, dism (12)

Continuar en cabeza


Cabeza:

Continuar desde el cuerpo

V20: (1pb, aum)x6 (18)

V21: (2pb, aum)x6 (24)

V22: (3pb, aum)x6 (30)

V23: (4pb, aum)x6 (36)

V24: (5pb, aum)x6 (42)

V25 – 31: (7 vueltas) 42pb (42)

V32: (5pb, dism)x6 (36)

V33: (4pb, dism)x6 (30)

Poner los ojos entre las vueltas 26 y 27 con 6 puntos de separación.

V34: (3pb, dism)x6 (24)

Rellena firmemente

V35: (2pb, dism)x6 (18)

V36: (1pb, dism)x6 (12)

Termina de rellenar

V37: 6dism (6)

Rematar


Orejas:

hacer 2

V1: 5pb en AM (5)

Cortar y dejar una hebra larga para coser:

Coser cada oreja a la altura de los ojos con una separación de 4 puntos.


Cabello:

Con negro. Recomiendo usar un crochet más grueso, de 2,5mm.

V1: 6pb en Am (6)

V2: 6aum (12)

V3: (1pb, aum)x6 (18)

V4: (2pb, aum)x6 (24)

V5: (3pb, aum)x6 (30)

V6: (4pb, aum)x6 (36)

V7 (1 vuelta) 36pb (36)

Comienza haciendo los mechones: teje 5cad y a partir de la segunda desde el crochet haz 4mpa, pe en los siguientes 3 puntos, (5cad, a partir de la segunda cad, 4mpa, saltarse un punto, pe) repetir alrededor.

Cose el cabello a la cabeza. El espacio de 3puntos que dejamos quedarán en la frente, para que pueda verse su cicatriz.


Detalles finales:

Cortar un pequeño triángulo de paño lenci (fieltro) blanco. Pegarlo en el pecho de nuestra muñequita para simular su blusa. Con gris borda las orillas del sweater y la corbata.

Corta una tira larga y delgada de fieltro y pégala al cuello para simular el cuello de la blusa.

Con hilos rojos y amarillos borda los detalles alrededor de la cintura y el cuello del sweater de Hermione (guíate por las imágenes)

Con hilo de bordar blanco y negro haz los detalles en los ojos, las cejas y la cicatriz y con rosado borda líneas bajo los ojos para hacer las mejillas sonrojadas.  Con color piel claro borda la nariz entre los ojos.

Cose los lentes a su cabecita.


¡Listo! Ya tienes listo a tu mini Harry!

Si lo tejes, no olvides etiquetarme en tus RRSS! Usa el hashtag #blondieamigurumis; en instagram usa @blondieamigurumis y en facebook @Blondieamigurumis Chile.


Si quieres compartir este patrón hazlo directamente compartiendo el link de esta entrada. Está prohibido sacar screenshots, traducir, hacer retos o talleres sin mi autorización utilizando este patrón.


Tiny Harry Potter Amigurumi Pattern in English


You can make your own tiny Harry Potter by following these instructions. The final size of the doll will be 10 cms (4 inches) when using similar materials.

THIS IS A FREE PATTERN.  Crochet design by María Paz Jélvez Herrera (Blondieamigurumis)
If you want to share this pattern please do it directly sharing the link of this entry. Taking screenshots, translating this pattern, making challenges or CALs or online videos without my permission is absolutely prohibited.
You might sell finished dolls made with this pattern. If you share your work on social media, please tag me as the pattern designer.

This Pattern is worked in spiral unless told otherwise.

Materials

  • Cotton yarn: nude, light gray, dark gray and black.
  • 2mm crochet hook
  • 2.5 or 3mm crochet hook
  • 8mm safety eyes
  • Embroidery floss: yellow, red, white and black.
  • Small metal glasses. If you don't have, you can make your own.
  • Yarn Needle
  • White felt
  • Glue

Abbreviations


MR: magic ring

Sc: single crochet

Inc: increase

Decdecrease

Hdc: half double crochet

Chchain

Sl st: slip stitch

(  )x numberrepeat x times

(number): stitches at the end of the round

st: stitch


Arms:

Use nude, do not stuff.

R1: 5sc in MR (5)

R2: (1 round)5sc (5) change to gray

R3  (6 rounds) 5sc (5)

Flatten the arm and work 2sc on both layers 

Fasten off.


Legs:

Use black, stuff as you go, do not cut the yarn on the second leg.

R1: 6sc in MR (6)

R2: 6inc (12)

R3: 3sc, 3dec, 3sc (9) change to dark gray

R4: 3sc, dec, 4sc (8)

R5 -9: (5 rounds) 8sc (8) 

Cut the yarn only on the first leg, since we will continue in the body. 


Body

R10, join legs: 3sc, 2ch, 8sc in the first leg, 2sc in ch, 8sc in the second leg, 2sc in ch (20)

R11 – 12: (2 rounds) 20sc (20)change to gray

R13 - 14 (2 rounds) 20sc (20)

R15: 4sc, dec6sc, dec6sc (18)

R16: (1 round) 18sc (18)

R173scdec, 6sc, dec,5sc (16)

R18: 3sc, dec, 4sc, dec5sc(14) change to nude

R19: Join arms2sc, join the first arm working on both the arm and the body 2sc, 1sc, dec, 1scjoin the second arm working on both the arm and the body 2sc2sc, dec (12)

Continue in head


Head:

Continue from body

V20: (1sc, inc)x6 (18)

V21: (2sc, inc)x6 (24)

V22: (3sc, inc)x6 (30)

V23: (4sc, inc)x6 (36)

V24: (5sc, inc)x6 (42)

V25 – 31: (7 rounds) 42sc (42)

V32: (5sc, dec)x6 (36)

V33: (4sc, dec)x6 (30)

Attach eyes between rounds 26 and 27 with 6 stitches between them.

V34: (3sc, dec)x6 (24)

Stuff firmly

V35: (2sc, dec)x6 (18)

V36: (1sc, dec)x6 (12)

Finish stuffing

V37: 6dec (6)

Finish off


Ears:

make 2

R1: 5sc in MR (5)

Cut a long tail for sewing.

Sew to the head next to the eyes (4 stitches apart from them)


Hair:

Use black and a thicker crochet hook. I recommend a 2.5 hook.

R1: 6sc in MR (6)

R2: 6inc (12)

R3: (1sc, inc)x6 (18)

R4: (2sc, inc)x6 (24)

R5: (3sc, inc)x6 (30)

R6: (4sc, inc)x6 (36)

R7:(1 round) 36pb (36)

Start making the hair locks: work 5 ch and starting in the second ch from hook work 4hdc, sl st in the next 3 stitches, (5ch, in the 2dn ch from hook work 4hdc, skip 1 st, sl st) repeat around.

Sew the hair to the head. The 3st-gap should be in the forehead, so the scar can be seen.


Final details:

Cut a small white felt triangle. glue it to the chest as the shirt. using gray, embroider the sweater edges and the tie.

Cut a long strip of felt and stick it to the neck to simulate the shirt collar.

Using red and yellow floss, embroider the details on the waist and the collar of the sweater. 

Using white and black floss, embroider the eyes details, the eyebrows and the scar and make lines below the eyes with pink. 

Use some nude yarn to embroider a nose between the eyes.

Sew the glasses to Harry's head.


 You're ready! You have finished Harry!

If you crochet him, don't forget to tag me on your social media! Use the hashtag #blondieamigurumis; on instagram use @blondieamigurumis and on facebook, @Blondieamigurumis Chile.


If you want to share this pattern please do it directly sharing the link of this entry. Taking screenshots, translating this pattern, making challenges or CALs or online videos without my permission is absolutely prohibited.