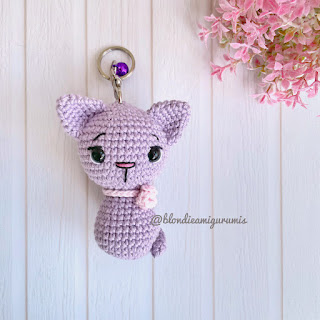
Gatito Amigurumi Llavero - Patrón Crochet en Español


Patrón crochet amigurumi gato llavero. Tutorial para tejer un tierno gatito llavero.

Me pidieron que hiciera un patrón simple para ser enseñado en una clase en vivo de Instagram! Estaba muy nerviosa porque era mi primera vez haciendo un tutorial en vivo, pero funcionó muy bien! Hicimos esta tierna gatita y la gente disfrutó mucho haciéndola! 

Sé que muchas personas no pudieron verla por tiempo o simplemente porque no se enteraron. Así que me decidí y acá les dejo el patrón de este tierno llaverito! Anímate a hacerlo!!


ESTE ES UN PATRÓN GRATUITO.  Diseño de Crochet de María Paz Jélvez Herrera (Blondieamigurumis)
Si quieres compartir este patrón, por favor hazlo directamente copiando el link de esta entrada. El sacar screenshots, traducir este patrón, hacer desafíos o CALs o videos online sin mi permiso está absolutamente prohibido.
Puedes vender los muñecos terminados con este patrón. Si compartes tu trabajo en RRSS, por favor etiquétame como diseñadora del patrón. 


Materiales:

  • Hilo de algodón color lila y rosado claro (Chile: Revesderecho lila claro n.063 y rosado pálido n. 225). Los colores son opcionales, puedes usar tus colores favoritos.
  • Crochet (ganchillo) de  2.5mm
  • Ojos de seguridad de 9mm
  • Hilo de bordar blanco, negro y rosado.
  • Aguja lanera
  • Tijeras
  • Marcador de puntos
  • Algodón sintético (relleno)
  • Argolla de llavero
  • Mosquetón (opcional)
  • Pequeño cascabel o campanita y argolla de metal pequeña (opcional)

Abreviaciones:


AM: anillo mágico

Pb: punto bajo

Aum: aumento

Dismdisminución 

Mpa: medio punto alto

Cadcadeneta (cadena)

Pe: punto enano o deslizado

(  )x númerorepetir x veces

(número): cantidad de puntos al final de la vuelta.


Ahora tejamos a nuestro amiguito!


Teje en espiral, a menos que se indique lo contrario.

Cuerpo y cabeza:


Con lila

Rellena a medida que se avanza.


V1: Hacer 6pb en AM (6)

V2: 6aum (12)

V3: (pb, aum)x6 (18)

V4: (2pb, aum)x6 (24)

V5: (3pb, aum)x6 (30)

V6 - 9: (4 vueltas) 30pb (30)

V10: (3pb, dism)x6 (24)

V11: (1 vuelta) 24pb (24)

V12: (2pb, dism)x6 (18)

V13: (1 vuelta) 18pb (18)

V14: (4pb, dism)x3 (15)

V15: (4pb, aum)x3 (18)

V16: (2pb, aum)x6 (24)

V17: (3pb, aum)x6 (30)

V18: (4pb, aum)x6 (36)

V19: (5pb, aum)x6 (42)

V20 -26 (7 vueltas) 42pb (42) Insertar los ojos entre las vueltas 21 y 22 con 6 puntos entre ellos. 

V27: (5pb, dism)x6 (36)

V28: (4pb, dism)x6 (30)

V29: (3pb, dism)x6 (24)

No te olvides de rellenar.

V30: (2pb, dism)x6 (18)

V31: (pb, dism)x6 (12)

V32; 6dism (6)

Usa una aguja para rematar pasando sólo por la hebra de adelante de los 6 puntos que quedaron.


Orejas:


Usar lila

Hacer 2

No rellenar.


V1: 4pb en AM (4)

V2: 4aum (8)

V3: (3pb, aum)x2 (10)

V4: (4pb, aum)x2 (12)

V5: (5pb, aum)x2 (14)

V6: (1 vuelta) 14pb (14)

Cerrar y cortar una hebra larga para coser.


Cola: 


Usar lila

No rellenar.


V1: 6pb en AM (6)

V2 - 11 (10 vueltas) 6pb (6)


Collar:


Usar rosado

Hacer 20 cad y cortar una hebra larga para coser.


Flor:


Con rosado

8 cad

Comenzar en la tercera cad desde el ganchillo:  (mpa, mpa, 2cad, pe en el mismo punto)x3


Debería verse algo así:


Luego, enrolla los pétalos como se ve en la foto. Cóselo para que no se desarme.


Armado:


Coser las orejas entre las vueltas 25 y 29. Cose la cola a la parte baja de la espalda del gato y luego a su lado. Coser el collar en la parte de atrás y luego cose la flor. Borda los detalles de la cara: con blanco borda en el área externa de los ojos y con negro haz la línea de las pestañas y las cejas. Con rosado borda la nariz entre los ojos y con negro termina los detalles de la misma.

Usa una argolla de llavero y un mosquetón para convertir a tu gatito en un llavero. Como opción, puedes también ponerle un cascabel con una argollita de metal. 


Y voilà! Tu llavero de gatito amigurumi está listo!! 
Si lo tejes, no te olvides de etiquetarme en tus RRSS para ver tu trabajo listo! Recuerda que si quieres compartir este patrón, debes hacerlo directamente con el link de este blog y no a través de screenshots. 
¡Feliz tejido!


Niño disfrazado de Gato - Patrón Crochet Amigurumi Español


Hoy es el cumpleaños número 13 de BlondieAmigurumis! Y en Chile, agosto es el mes de los Gatos! Así que para celebrar ambos (soy una gran catlover), tengo un regalito para ustedes! es un tierno niñito disfrazado de gato! Al parecer se está preparando para Halloween, así que quizás habrá más amigos como él! ¿Quién sabe? 

¿Te gustaría ver a más niños disfrazados? ¿Qué animal? Me encantaría que me den más ideas. 

Este tutorial también está disponible en mi canal de YouTube como video tutorial. Pueden encontrarlo aquí.  Puede ser útil si necesitar ver cómo  hacer los detalles o algo que no entiendas. También puedes adquirir el PDF de este patrón a un valor muy bajo en Etsy aquí o en Ravelry aquí.

ESTE ES UN PATRÓN GRATUITO.  Diseño de Crochet de María Paz Jélvez Herrera (Blondieamigurumis)
Si quieres compartir este patrón, por favor hazlo directamente copiando el link de esta entrada. El sacar screenshots, traducir este patrón, hacer desafíos o CALs o videos online Ian mi permiso está absolutamente prohibido.
Puedes vender los muñecos terminados con este patrón. Si compartes tu trabajo en RRSS, por favor etiquétame como diseñadora del patrón. 


Este patrón se trabaja en espiral, a menos que se indique lo contrario.

Materiales:

  • Hilo de algodón piel claro, negro, rojo y rosado.
  • Crochet (ganchillo) de 2,75mm
  • Ojos de seguridad de 10mm
  • Marcador de puntos
  • Hilo de bordar negro y blanco
  • Aguja lanera
  • Algodón de relleno
  • Argolla pequeña de metal
  • Cascabel o campanita
  • Alicate
  • Tijeras
  • Alambre eléctrico (opcional)

Abreviaciones:

AM: anillo mágico
pb: punto bajo
Aun: aumento
Dism: disminución
map: medio punto alto
Cad: cadeneta o cadena
pe: punto enano
(  )x número repetir x veces
(número): cantidad de puntos al final de la vuelta


Brazos:

Hacer 2
Usar beige
Rellenar ligeramente sólo la primera mitad del brazo

1: 6pb en AM(6)
2: (2pb, aum)x2 (8)
3 - 14 (12 vueltas) 8pb(8)
Rellenar
Aplastar el brazo y tejer 3pb en ambas capas

Cortar una hebra larga.

Piernas: 

Usar beige
Hacer 2
Rellenar firmemente a medida que avanzas.
No cortar la hebra de la segunda pierna,  ya que continuaremos trabajando en el cuerpo.

Hacer 7cad
Comenzando desde la segunda cad desde el ganchillo, trabajar alrededor de la cadena:
1: 5pb, 3pb en el mismo punto, 4pb, aum(14)
2: aum 4pb, 3aum, 4pb, 2aum(20)
3: pb, aum, 4pb, (pb, aum)x3, 4pb, (pb, aum)x2 (26) 
4: 6pb, 6dism, 8pb (20)
5: 5pb, 4dism, 7pb (16)
6: 3pb, 4dism, 5pb (12)
7 - 20 (14 vueltas) 12pb(12)
Cortar hebra en la primera pierna. No cortar ene la segunda. Continuar en el cuerpo. 

Cuerpo

Continuar desde los brazos
Usar beige

1: 4pb en la segunda pierna, 3cad, unir al penúltimo punto de la primera pierna, 12pb, 3pb en la cad, 12pb en la segunda pierna, 3pb en cad. (30)
2 - 9 (8 vueltas) 30sc (30)
10: 5pb, dism, 12pb, dism, 9pb (28)
11: (1 vuelta) 28pb (28)
12: 5pb, dism, 12pb, dism, 7pb (26)
13: (1 vuelta) 26pb (26)
14: 4pb, dism,12pb, dism, 6pb(24)
15: 3pb, unir el primer brazo tejiendo 3pb tanto en el brazo como en el cupel, 9pb, unir el segundo brazo con 3pb, 6pb (24)
16: (2pb, dism)x6 (18)
17: (1 vuelta 18pb (18)
Cortar hebra dejando una hebra larga para coser a la cabeza.
Usa la hebra que quedó de los brazos para hacer pequeñas puntadas para que queden más firmes.

Cabeza:

Usar piel claro

1: 6pb en AM (6)
2: 6aum (12)
3: (pb, aum)x6 (18)
4: (2pb, aum)x6 (24)
5: (3pb, aum)x6 (30)
6: (4pb, aum)x6 (36)
7: (5pb, aum)x6 (42)
8: (6pb, aum)x6 (48)
9 - 18 (10 vueltas) 48pb (48)
19: (6pb, dism)x6 (42)
Poner los ojos entre las vueltas 15 y 16 con 8 puntos entre ellos.
20: (5pb, dism)X6 (36)
21: (4pb, dism)x6 (30)
Rellenar firmemente
22: (3pb, dism)x6 (24)
23: (2pb, dism)x6 (18)
24: (pb, dism)x6 (12)
Terminar de rellenar
25: 6dism (6)
Rematar

Gorrito

Usar beige

1: 6pb en AM (6)
2: 6aum (12)
3: (pb, aum)x6 (18)
4: (2pb, aum)x6 (24)
5: (3pb, aum)x6 (30)
6: (4pb, aum)x6 (36)
7: (5pb, aum)x6 (42)
8: (6pb, aum)x6 (48)
9 - 17 (9 vueltas) 48pb (48)
Meter la cabeza dentro del gorrito (ver foto). Continúa tejiendo y cerrando.
18: (6pb, dism)x6 (42)
19: (5pb, dism)X6 (36)

Orejas:

Hacer 2
Usar beige

1: 4pb en AM (4)
2: 4aum (8)
3: (3pb, aum)x2 (10)
4: (4pb, aum)x2 (12)
5: (5pb, aum)x2 (14)
6: (6pb, aum)x2 (16)
7: (1 vuelta) 16pb (16)
Cortar una hebra larga para coser

Cola:

Usar beige

1: 6pb en AM (6)
2 -18 (17 vueltas) 6pb (6)
Cortar una hebra larga para coser.


Collar:
Usar rojo

Hacer 27 cad
Comenzar en la tercera cad, tejer 25mpa
Cortar una hebra larga para coser.

Armado:


1: Coser las orejas a la cabeza 6 vueltas desde la orilla del gorrito. Deben tener 7 puntos entre ellas. 

2: Coser el cuerpo a la cabeza


3: Coser la cola al cuerpo. Opcional: usa alambre eléctrico en la cola. Deja una pequeña parte más larga que la cola para poder introducirla al cuerpo del muñeco.


4: Coser el collar al cuello. Pon el cascabel usando la argolla de metal. Si no tienes una argolla, puedes coser la campana.


voilà! Está listo tu niño disfrazado de gato!
Si lo tejes, no te olvides de etiquetarme en tus RRSS para ver tu trabajo terminado! Recuerda que si quieres compartir este patrón, por favor hazlo compartiendo su link y no sacando pantallazos.
Muchas gracias!! 


Boy in Cat Costume - English Amigurumi Crochet Pattern


Boy in cat costume patten crochet amigurumi handmade tutorial


Today is BlondieAmigurumis 13th Anniversary! And in Chile, August is the month of the cat! So, in order to celebrate both (I'm a big Catlover myself) I have this gift for you! It's a sweet Boy wearing a cat costume! I guess he's getting ready for Halloween, so maybe there will be more friends like him! who knows?! 

Would you like to see more kids in costumes? what animal? I'd love if you gave me more ideas!!

This tutorial is also available on my YouTube Channel as a videotutorial in Spanish. You can find it here. It can be useful if you need to see how to make the details or something you don't understand. You can also buy an inexpensive PDF for this pattern on Etsy here or in Ravelry here.

THIS IS A FREE PATTERN.  Crochet design by María Paz Jélvez Herrera (Blondieamigurumis)
If you want to share this pattern please do it directly sharing the link of this entry. Taking screenshots, translating this pattern, making challenges or CALs or online videos without my permission is absolutely prohibited.
You might sell finished dolls made with this pattern. If you share your work on social media, please tag me as the pattern designer.

This Pattern is worked in spiral unless told otherwise.

Materials:

  • Nude, beige, black, red and pink cotton yarn 
  • 2.75mm crochet hook 
  • 10mm safety eyes 
  • Stitch marker 
  • Black and white embroidery floss 
  • Yarn needle 
  • Fiberfill 
  • Small metal ring 
  • Sleigh bell 
  • Pliers 
  • Scissors
  • Wire (optional)

Abbreviations:

MR: magic ring
Sc: single crochet
Inc: increase
Dec: decrease
Hdc: half double crochet
Ch: chain
Sl st: slip stitch
(  )x number: repeat x times
(number): stitches at the end of the round


Arms:

Make 2
Use beige
Stuff slightly only on the first half of the arm.

1: 6sc in MR (6)
2: (2sc, inc)x2 (8)
3 - 14 (12 rounds) 8sc (8)
Stuff
Flatten the arm and then work 3sc on both layers
Fasten off, leaving a tail.


Legs: 

Use beige
Make 2
Stuff firmly as you go.
Do not cut the yarn on the second leg, since we will continue working in the body.

Work 7ch
Starting in the second ch from hook, work around the chain:
1: 5sc, 3sc in the same stitch, 4sc, inc (14)
2: inc, 4sc, 3inc, 4sc, 2inc (20)
3: sc, inc, 4sc, (sc, inc)x3, 4sc, (sc, inc)x2 (26)
4: 6sc, 6dec, 8sc (20)
5: 5sc, 4dec, 7sc (16)
6: 3sc, 4dec, 5sc (12)
7 - 20 (14 rounds) 12sc (12)
Fasten off in the first leg. Do not cut the yarn in the second leg. Continue on body.

Body

Continue from legs
Use beige

1: 4sc in the second leg, 3ch, join to the second-to-last stitch of the first leg, 12sc, 3sc in ch, 12sc in the second leg, 3sc in ch. (30)
2 - 9 (8 rounds) 30sc (30)
10: 5sc, dec, 12sc, dec, 9sc (28)
11: (1 round) 28sc (28)
12: 5sc, dec, 12sc, dec, 7sc (26)
13: (1 round) 26sc (26)
14: 4sc, dec, 12sc, dec, 6sc (24)
15: 3sc, join first arm by working 3sc in both the arm and the body, 9sc, join 2nd arm working 3sc, 6sc (24)
16: (2sc, dec)x6 (18)
17: (1 round) 18sc (18)
Fasten off leavig a long tail for sewing to the head.
Use the arms remaining yarn to make small stitches on the side of the arms to secure them.

Head:

Use nude

1: 6sc in MR (6)
2: 6inc (12)
3: (sc, inc)x6 (18)
4: (2sc, inc)x6 (24)
5: (3sc, inc)x6 (30)
6: (4sc, inc)x6 (36)
7: (5sc, inc)x6 (42)
8: (6sc, inc)x6 (48)
9 - 18 (10 rounds) 48sc (48)
19: (6sc, dec)x6 (42)
Attach eyes between rounds 15 and 16 with 8 stitches between them.
20: (5sc, dec)X6 (36)
21: (4sc, dec)x6 (30)
Stuff firmly
22: (3sc, dec)x6 (24)
23: (2sc, dec)x6 (18)
24: (sc, dec)x6 (12)
Finish stuffing 
25: 6dec (6)
Finish off.


Bonnet

Use beige

1: 6sc in MR (6)
2: 6inc (12)
3: (sc, inc)x6 (18)
4: (2sc, inc)x6 (24)
5: (3sc, inc)x6 (30)
6: (4sc, inc)x6 (36)
7: (5sc, inc)x6 (42)
8: (6sc, inc)x6 (48)
9 - 17 (9 rounds) 48sc (48)
Insert the head inside the bonnet (see photo). Continue working and closing.
18: (6sc, dec)x6 (42)
19: (5sc, dec)X6 (36)

Ears:

Make 2
Use beige

1: 4sc in MR (4)
2: 4inc (8)
3: (3sc, inc)x2 (10)
4: (4sc, inc)x2 (12)
5: (5sc, inc)x2 (14)
6: (6sc, inc)x2 (16)
7: (1 round) 16sc (16)
Fasten off, leaving a long tail for sewing.


Tail:

Use beige

1: 6sc in MR (6)
2 -18 (17 rounds) 6sc (6)
Fasten off leaving a long tail for sewing.


Collar:
Use red 

Work 27 chains
Starting on the third ch, work 25hdc,
Fasten off leaving a tail for sewing

Assembly:


1: Sew the ears to the head 6 rounds apart from the edge of the bonnet. They should have 7 stitches between them.

2: Sew the body to the head.

3: Sew the tail to the body. Optional: use eletric wire on the tail, Leave a small part to insert it into the body of the doll. 

4: Sew the collar to the neck. Attach the bell using the metal ring. If you don't have a ring, you can sew the bell.


And voilà! Your boy in a cat costume is ready!!!
If you crochet it, don't forget to tag me on your social media to see your finished work!! Remember that if you want to share this pattern, please do it by sharing its link and not taking screenshots of it.
Thank you!!


Amigurumi Cat Keychain - Pattern in English


You'll learn how to make a cute cat keychain with this crochet amigurumi pattern.

I was asked to make a simple pattern to be shown on a live video on Instagram. I was very nervous because it was my first time doing a live tutorial. And it went great! We made this cute little cat and people enjoyed making it! I know many of you couldn't watch it because of the time and the language, so here you can find its pattern!

THIS IS A FREE PATTERN.  Crochet design by María Paz Jélvez Herrera (Blondieamigurumis)
If you want to share this pattern please do it directly sharing the link of this entry. Taking screenshots, translating this pattern, making challenges or CALs or online videos without my permission is absolutely prohibited.
You might sell finished dolls made with this pattern. If you share your work on social media, please tag me as the pattern designer.


Materials:

  • Light purple and light pink cotton yarn. Colors are optional, you can use your favorite ones.
  • Crochet hook  2.5mm
  • 9mm safety eyes
  • White, black and pink embroidery floss
  • Yarn needle
  • Scissors
  • Stitch marker
  • Fiberfill
  • Keychain ring
  • Carabiner (optional)
  • Small sleigh bell and small metal ring (optional)

Abbreviations:


MR: magic ring

Sc: single crochet

Inc: increase

Decdecrease

Hdc: half double crochet

Chchain

Sl st: slip stitch

(  )x numberrepeat x times

(number): stitches at the end of the round


Now, Let's crochet our new friend!


Work in spiral unless told otherwise.

Body and head:


With light purple

Stuff as you go.


R1: Work 6sc in MR (6)

R2: 6inc (12)

R3: (sc, inc)x6 (18)

R4: (2sc, inc)x6 (24)

R5: (3sc, inc)x6 (30)

R6 - 9: (4 rounds) 30sc (30)

R10: (3sc, dec)x6 (24)

R11: (1 round) 24sc (24)

R12: (2sc, dec)x6 (18)

R13: (1 round) 18sc (18)

R14: (4sc, dec)x3 (15)

R15: (4sc, inc)x3 (18)

R16: (2sc, inc)x6 (24)

R17: (3sc, inc)x6 (30)

R18: (4sc, inc)x6 (36)

R19: (5sc, inc)x6 (42)

R20 -26 (7 rounds) 42sc (42) Attach eyes between rounds 21 and 22 with 6 stitches between them.

R27: (5sc, dec)x6 (36)

R28: (4sc, dec)x6 (30)

R29: (3sc, dec)x6 (24)

Don't forget to stuff.

R30: (2sc, dec)x6 (18)

R31: (sc, dec)x6 (12)

R32; 6dec (6)

Using a yarn needle, finish off working on the front loops of the remaining stitches.


Ears:


With light purple

Make2

Do not stuff.


R1: Work 4sc in MR (4)

R2: 4inc (8)

R3: (3sc, inc)x2 (10)

R4: (4sc, inc)x2 (12)

R5: (5sc, inc)x2 (14)

R6: (1 round) 14sc (14)

Fasten off leaving a long tail for sewing.


Tail: 


With light purple

Do not stuff.


R1: Work 6sc in MR (6)

R2 - 11 (10 rounds) 6sc (6)


Collar:


With pink

Work 20 chains, fasten off leaving a long tail for sewing


Flower:


With pink

Ch 8

Starting in the third ch from hook: (hdc, hdc, 2ch, sl st in the same stitch)x3


It should look like this:


Then, make a roll with the petals, as seen in the photo. Sew it so it doesn't unravel.


Assembly:

Sew the ears between rounds 25 and 29. Sew the tail to the back of the cat and then to the side of the cat. Sew the collar to the cat's neck and then sew the flower to it. 
Using embroidery floss, make the details o the face. With white, make a small line to the outer side of the eyes and with black, make the eyelashes line and the eyebrows. With pink, make the nose between the eyes and finish it with black.

Use a keychain  ring and a carabiner to turn your cat into a keychain. As an option, you can also attach a small sleigh bell with a metal ring. See photo.


And voilà! Your keychain amigurumi cat is ready!!!
If you crochet it, don't forget to tag me on your social media to see your finished work!! Remember that if you want to share this pattern, please do it by sharing its link and not taking screenshots. 
Happy crocheting!!


Amigurumi crochet keychain cat. Tutorial for crocheting a cute crochet cat.


Tiny Hermione Granger - Pattern in English


You can make your own tiny Hermione by following these instructions. The final size of the doll will be 10 cms (4 inches) when using similar materials.

Materials

  • Cotton yarn: nude, light gray, dark gray, black and brown.
  • 2mm crochet hook
  • 2.5 or 3mm crochet hook
  • 8mm safety eyes
  • Embroidery floss: yellow, red, white and black.
  • Yarn Needle
  • White felt
  • Glue

Abbreviations


MR: magic ring

Sc: single crochet

Inc: increase

Decdecrease

Hdc: half double crochet

Chchain

Sl st: slip stitch

(  )x numberrepeat x times

(number): stitches at the end of the round

Inc hdc: half double crochet increase


Arms:

Use nude, do not stuff.

R1: 5sc in MR (5)

R2: (1 round)5sc (5) change to gray

R3  (6 rounds) 5sc (5)

Flatten the arm and work 2sc on both layers 

Fasten off.


Legs:

Use black, stuff as you go, do not cut the yarn on the second leg.

R1: 6sc in MR (6)

R2: 6inc (12)

R3: 3sc, 3dec, 3sc (9) change to gray

R4: 3sc, dec, 4sc (8)

R5 -6: (2 rounds) 8sc (8) change to nude

R7 -9: (3 rounds) 8sc (8)

Cut the yarn only in the first leg, since we will continue in the body. Change to gray


Body

R10, join legs: 3sc, 2ch, 8sc in the first leg, 2sc in ch, 8sc in the second leg, 2sc in ch (20)

R11 – 14: (4 rounds) 20sc (20)

R15: 4sc, dec6sc, dec6sc (18)

R16: (1 round) 18sc (18)

R173scdec, 6sc, dec,5sc (16)

R18: 3sc, dec, 4sc, dec5sc(14) change to nude

R19: Join arms2sc, join the first arm working on both the arm and the body with 2sc, 1sc, dec, 1sc, join the second arm working on both the arm and the body with 2sc2sc, dec (12)

Continue in head


Head:

Continue from body

V20: (1sc, inc)x6 (18)

V21: (2sc, inc)x6 (24)

V22: (3sc, inc)x6 (30)

V23: (4sc, inc)x6 (36)

V24: (5sc, inc)x6 (42)

V25 – 31: (7 rounds) 42sc (42)

V32: (5sc, dec)x6 (36)

V33: (4sc, dec)x6 (30)

Attach eyes between rounds 26 and 27 with 6 stitches between them.

V34: (3sc, dec)x6 (24)

Stuff firmly

V35: (2sc, dec)x6 (18)

V36: (1sc, dec)x6 (12)

Finish stuffing

V37: 6dec (6)

Finish off


Ears:

make 2

R1: 5sc in MR (5)

Cut a long tail for sewing.

Sew to the head next to the eyes (4 stitches apart from them)


Skirt:

Use dark gray

6ch

(2hdc, 2sc, 1ch)x18

Continue on the side: 18sc(18), sl st in the first stitch. Sew the skirt to the body (round 14) and sew the sides of the skirt.


Hair:

Use brown and a thicker hook (2.5 or 3mm)

R1: 6sc in MR (6)

R2: 6inc (12)

R3: (1sc, inc)x6 (18)

R4: (2sc, inc)x6 (24)

R5: (3sc, inc)x6 (30)

R6: (4sc, inc)x6 (36)

R7 – 10: (4 rounds) 36pb (36)

Now, work on the locks of hair. Start on the fringe:

Turn the work and make 1sl st in the last stitch (start crocheting the other way around): (5ch, 4hdc, skip 1 stitch, sl st in next)x8

Continue working with the long locks: (15ch, 7hdc inc, 7hdc)x10

Sew the hair to the head. Make sure the fringe faces the front of the head.


Final details:

Cut a small white felt triangle. glue it to the chest as the shirt. using gray, embroider the sweater edges and the tie.

Cut a long strip of felt and stick it to the neck to simulate the shirt collar.

Using red and yellow floss, embroider the details on the waist and the collar of the sweater. 

Using white and black floss, embroider the eyes details and make lines below the eyes with pink. 

With brown yarn make the eyebrows and use some nude yarn to embroider a nose between the eyes.


You're done! You have finished Hemione!

If you crochet her, don't forget to tag me on your social media! Use the hashtag #blondieamigurumis; on instagram use @blondieamigurumis and on facebook, @Blondieamigurumis Chile.


If you want to share this pattern please do it directly sharing the link of this entry. Taking screenshots, translating this pattern, making challenges or CALs or online videos without my permission is absolutely prohibited.